Table Of Contents
Introduction
These notes will take you through the process of preparing a photograph for sand blasting; it will then go through the correct steps for sandblasting the halftone.
Before starting we need to consider one important rule. “The bigger, the better!” This applies to both the original photo that you’re working from, and the size of the final sandblasted image. Small photos can be done, but the larger you can make it the better it will be to work with and the better the final product will look.
In order to sandblast a photo consisting of many different tones, shades and colors we must convert it into a half tone image. Halftone artwork is used to reproduce grayscale images by breaking the image into small dots (like photos in the newspaper). These dots will vary in size to represent the tonal areas of the artwork, giving the illusion of a grayscale image.
Required Elements
For ease of use, when blasting half tone photos try SR3000™ 3mil self stick resist. You will need to have a copy of Adobe Photoshop (this procedure and techniques are for Photoshop only) to make the necessary adjustments and conversions. For best results, you will also need to print your artwork onto LaserFilm™ or InkJet Film™ instead of normal vellum paper. These films have a higher level of transparency and allow superior exposure onto the SR3000™ resist.
It is very important to get a quality exposure onto the SR3000™ to ensure the entire image comes out at the highest possible quality. The best exposure unit to use for producing half tone photo resists is the 26-1KS NuArc® U.V. Exposure System, this a built-in vacuum system to create exact exposures of every little dot. However if you do not have one of the NuArc systems, the Letralite exposure lamp can also be used. When using the Letralite make sure the acrylic tube is clean from specks and the black rubber mat is not too stretched and loose around the tube. Having even a slightly loose mat around your exposure can greatly affect the consistency of your final result. It may be necessary to purchase a new tight rubber mat for the Letralite if yours is too old and causing exposure issues.
Photo Preparation

It is important to start with a good high quality image, the lower the quality of the photo the more work and time you will have to spend on touching it up in Photoshop. Standard printing resolution is 300dpi. 300dpi and anything over is ideally what you want when your going to sandblast as a half tone. The most common way to receive a photo from a client is via email. Digital photos are usually 72dpi, which means you will need to adjust them a fair bit. If it is possible, get the client to provide a physical print of the photo for you to scan at a nice high resolution (300dpi or 600dpi). Once you have your photo in a digital format open the photo in Photoshop.
Now you need to establish what size the image needs to be on the final job. You may need to measure the physical area. When you have these measurements, create a new document in Photoshop to the appropriate size with a resolution of 300dpi and color mode set to gray-scale. (see fig.1)
Now drag your image onto the new blank canvas. Once you’ve got your image on the new canvas, use the Free Transform tool (Ctrl + T) to adjust the image size by dragging the corners with the Shift key held down. Get your image positioned where you want it on the canvas then use the Rectangular Marquee Tool to select the entire canvas at it is.
Now that your image is the correct size and in gray-scale. We are ready to start adjusting the photo for the half tone conversion. This is the most important part of the process. Preparing the image correctly ensures a high quality realistic half tone. First we must decide if the background of the image is suitable. If it is too complicated or not important and detracting from the subject separate the subject from the background. There are many ways to achieve this in Photoshop. If the subject has a hairy or furry edge, a good technique is the ‘Extract’ tool in the ‘Filter’ menu. To use this simply outline the image with the highlighter tool , then use the paint bucket to fill in the subject. (see fig.2)


Now use the masking tool to clean up the edges around your subject (see fig.3). Clicking will erase with this tool and clicking while holding ‘Alt’ will restore image. Its a good idea to spend a little time getting a good clean edge.
(see fig.4).
Now that your image is the correct size and in grayscale. We are ready to start adjusting the photo for the half tone conversion. This is the most important part of the process. Preparing the image correctly ensures a high quality realistic half tone. First we must decide if the background of the image is suitable. If it is too complicated or not important and detracting from the subject separate the subject from the background. There are many ways to achieve this in Photoshop. If the subject has a hairy or furry edge, a good technique is the ‘Extract’ tool in the ‘Filter’ menu. To use this simply outline the image with the highlighter tool , then use the paint bucket to fill in the subject. (see fig.2)
Now use the masking tool to clean up the edges around your subject (see fig.3). Clicking will erase with this tool and clicking while holding ‘Alt’ will restore image. Its a good idea to spend a little time getting a good clean edge.
(see fig.4).
Now that we have the subject free from the background. It’s time to put a simple more suitable background in. There are two options for simple backgrounds, depending on what suits the image/job. The first is simply a 20% black (see fig.5). To achieve this create a new layer and make it completely black then pull back the ‘Fill’ in the ‘Layers’ palette to 20%. The other option is a simple cloud background (see fig.6). To do this create a new layer and select ‘Filter’ then ‘Render’ then ‘Clouds’,. keep re-applying the filter until you have a background that you like.

The next step to preparing the photo for half tone conversion is to level out the brightness and contrast. First select the subjects layer, then in the ‘Image’ menu got to ‘Adjustments’ then ‘Levels’, Bring the sliders towards each other a little bit to bring out the detail in the subject, and move the middle slider to make the whole image lighter. Now we use the ‘Clone Stamp’ tool .The idea here is to eliminate any vast differences in contrast.
Hold ‘Alt’ while over a suitable tonal area.
Then with the ‘Opacity’ in the top tool bar set to about 45%, level out any very bright areas and shines. Do the same with areas that are too dark by selecting a lighter tone with the clone stamp. You may also like to use the ‘Dodge’ and ‘Burn’ tools to lighten and darken problem areas.
It is extremely important to get the whites of the eyes and teeth bright enough. The more time you spend getting your photo to the right levels the better and more realistic your half tone will look on the end product. It is a good idea to save your image at this stage so you can go back to it if there are still problem areas during washout. It’s a good idea to do a test at this stage so you can do any fine tuning of too light and too dark areas.
Converting to the Half Tone
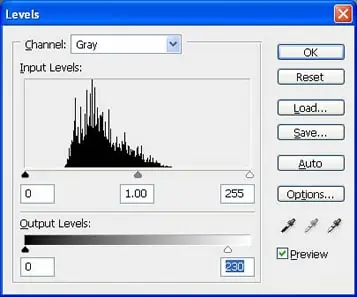
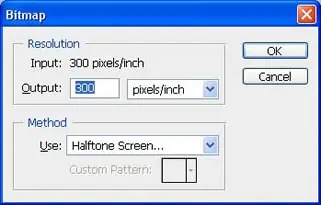
Pure white areas generally don’t look good when sandblasted. To compensate for this we will limit our image to 90% of pure white. Open the Levels control panel (Ctrl+L) and set the Output Levels to 0 and 230 (see fig.7). Once this is completed, make sure the image is selected and go to ‘Image’ then ‘Mode’ then ‘Bitmap’. Set the output to 300ppi and the method to ‘Halftone Screen’ (see fig.8).
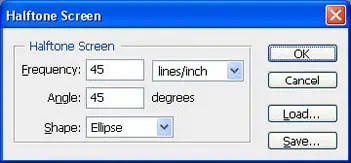
Set the half tone settings to ‘Frequency 45’, ‘Angle 45’ and ‘Shape Ellipse’ (see fig.9).
Now that your image is a hal f tone you are almost complete. But before we print and sand blast we must ‘Invert’ the image to create a negative. Do this by selecting the image and going to the ‘Image’ menu, ‘Adjustments’ then ‘Invert’ (see fig.10).
Printing and Exposing
When satisfied with the results of your image, output a test print your image by printing it onto your LaserFilm or InkJet Film. Expose the film negative with SR3000™ 3 mil photos resist film (25 seconds with the Letralite UV exposure lamp). If you are using a Letralite make sure your black rubber mat is nice and tight against the clear tube. If there is any slack in your mat you may have trouble getting a good exposure. This will cause all sorts of problems, so if your mat is loose we strongly recommend replacing it before attempting a half tone photo.
Washing out Your Halftone Photomask
The Rayzist hand washer is recommended for this process because of fan spray and pressure it creates. Hand washing a photo requires a little more of your attention to detail.
- Step 1: Place the exposed SR3000 photomask on the magnetic, white, Rayzist washout board. Use warm to hot water.
- Step 2: Wash 1 to 2” away from the photomask. Use up and down sweeping motions and keep the distance consistent. Be sure to washout just above the full length of your photomask to just beyond the full width of your photomask. Washing beyond the photomask, is necessary and will ensure an even washout process through the entire photomask.
Not washing the full length and width is a common mistake that occurs during the washout process.
If you are only washing out the middle areas of the photo image and leaving the edges to the last, this can lead to over washing the middle of your photo image and will cause the middle of your photomask to become over saturated with moisture and cause dots to shift and wash away.
Step 3: After the washout process is complete, hold the photomask up to the light. This will allow for a more apparent visual of your photomask being under washed or over washed.
If areas of the photograph are too bright then the dots become too small and that area will wash away. Adjustments can be made to the photograph based on the results of the washed areas of the photomask. It is important that the dark and light areas have continuous tone.
Applying Your Halftone Photomask
- Step 1: Clean your substrate with an appropriate cleaner.
- Step 2: Apply and secure your SR3000 photomask. Apply the photomask to your surface adhesive side down then beginning at one end, with a plastic burnishing tool to the opposite end firmly apply pressure and repeated sweeping motions securing the photomask to the surface.
- Step 3: Remove clear plastic carrier. Once the photomask is secure, quickly remove the clear plastic carrier from the photomask by flicking the corner of the photomask this will help loosen the carrier from the photomask making removal easy.
You have the option of releasing trapped air pockets from the photomask. When doing so, we recommend you use the Rayzist wire wheel brush on inflated areas affecting the artwork image only. The surrounding areas of the artwork do not require wire wheel brush action.
- Step 4: Tape your project. Using blasting tape, tape off exposed areas of your project this will protect it from being scratched or frosted by abrasive while engraving.
Tips:
It is important to get an even bond between the SR3000 photomask and your substrate.
In colder weather, we recommend you slightly warm your substrate; this will help the photomask and the substrate bond.
If for some reason your SR3000 photomask looses its tackiness, try quickly placing the SR3000 photomask face down onto a damp cloth or a blotting towel; this will re-activate the self stick properties of your photomask and allow for a strong even bond.
Sandblasting the Half Tone
While blasting, go over the entire area of the photo using a small circular blasting pattern in lines across the image and work your way over the entire artwork. You should be blasting at between 20 – 25psi when etching half tones, and always make sure your nozzle is perpendicular to the product. Once the clear membrane has been blasted away, this will be your indication that the surface your photo has been etched. Passing over your photo from top to bottom and left to right up to four times will provide the assurance that your photo has been etched evenly.
Remove the mask entirely or if paint filling is required, lightly coat with a light colored spray paint. Allow to dry and remove mask.
Summary
- Scan Photo at 300 – 600dpi (if required).
- Resize and convert image to grayscale.
- Remove background (if required).
- Adjust levels and prepare photo (paying special attention to eyes and teeth).
- Save a copy for possible fine tuning.
- Perform half tone conversion.
- Invert image.
- Test print. Then perform any fine tuning to tone and levels on saved photo (if required).
- Output to LaserFilm or InkJet film.
- Expose and washout. Allow to dry.
- Apply resist mask to object.
- Burnish.
- Sand blast.
- Clean Up.
- – Enjoy!