No products in the cart.
Back to Blog
Table Of Contents
Original From:
“What I love about sandcarving is the appearance of a deep etch in glass. I have been in the industry for 18 years, and I still run my fingers over the sandcarved area.” – Liz Haas
Introduction
This sandcarving film offers opportunity for high-value stagecarving, color fill, and more.
What I love about sandcarving is the appearance of a deep etch in glass. I have been in the industry for 18 years, and I still run my fingers over the sandcarved area.
Etched glass is especially beautiful when creative designs are used.
My second favorite feature of sandcarving is a color fill in an etched area. It can be hand painted or sprayed, and the beauty of a painted sandcarved product is something I admire. A color fill can provide a great contrast, especially on a dark-colored product, such as a wine bottle.
The combination of sandcarving and photoresist film provides countless options for creating personalized gifts, awards, spirit bottles, art glass, donor recognition, monuments, garden rocks, and more. Whether it’s a simple or creative design, photoresist film provides unlimited possibilities for decorating products. Photoresist film is durable, produces high-resolution images, and creates options for color fill and multistage carving or frosting glass.
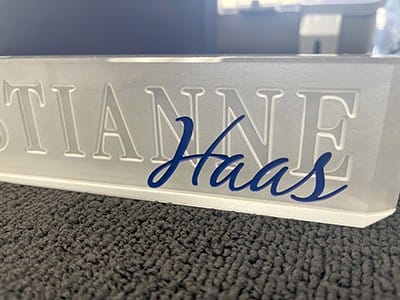
For this project, I took a simple nameplate and added value with a negative design, deep etching, frosting, and paint to create a unique gift. The first name fit perfectly on the back of the glass with a bold font and the last name was etched on the front, completed with the employee’s state seal.
Artwork
Bolder designs are great for etching deep; if the artwork is highly detailed, adjusting the design may be required. Thin lines in a design will need to be stroked for the etching to be pronounced.
As you can see in FIGURE 1, I slightly adjusted the state seal by squaring the star’s points. Reducing the tip of the point on a star will bring shape to the star when it is sandcarved. The artwork is set up as “black = blast.”
The detail in artwork dictates the thickness of photoresist film you will use and, therefore, how deep the blaster can etch. A good rule to follow is to never sandcarve deeper than half the width of the line; when you do, you create a V-shape cut that is difficult to view or read.

Photoresist Film
For a deep etch, I recommend 5-mil or thicker photoresist. I used SR3000™ 5Mil, which I used for the artwork with both names for this project.
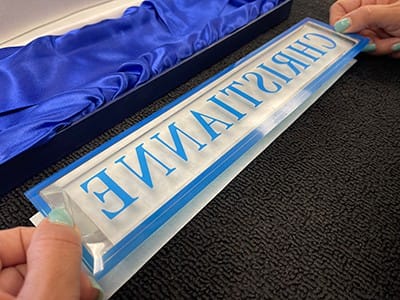
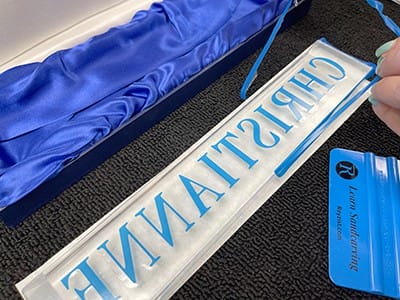
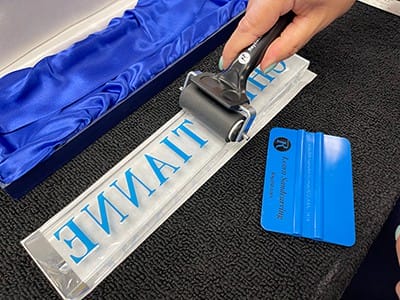
The negative artwork, shown being applied in FIGURE 2, is set up with a ¼-in. border. Since this is a negative image, a border is applied to the artwork. This border allows the applicator to separate the clear liner (FIGURE 3) from the photoresist film. Remove the border (FIGURE 4) once the stencil is applied. I also used a rubber brayer (FIGURE 5) to squeegee the stencil to the glass surface.
For the last name on the front of the artwork, I also used a 5-mil photoresist stencil, but I didn’t need a border since it isn’t a negative image.


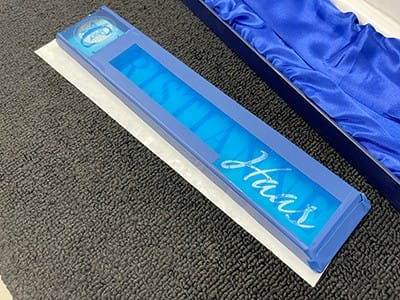


For the state seal (FIGURE 6), I used SR3000™ 3Mil Self-Stick film. This thinner film allows me to capture the detail in the design but is still thick enough to get sufficient carving depth to add a color fill.
Once the last name and state seal stencil were placed, a squeegee (FIGURE 7) and wire wheel brush (FIGURE 8) were used to secure the stencils to the surface.
I applied vinyl blast tape to surfaces that were exposed but should not be blasted. The ready-to-blast nameplate’s front and back are shown in FIGURE 9 and FIGURE 10, respectively.
Blast for Depth
Our negative image will be etched into the nameplate. The nameplate is optic crystal, and the etching will occur on the back to magnify the sandcarving. Optic crystal was used to provide the brightest appearance.
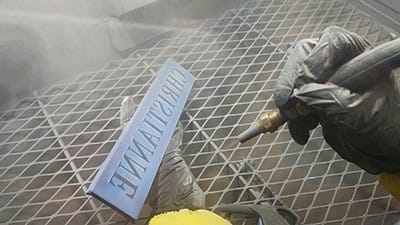
Nozzle control is important, especially on a negative design, to maintain an even etch. Move the nozzle slowly, keeping 4–5 in. from substrate (FIGURE 11). Eventually the photoresist will start to turn a light gray color (FIGURE 12) and darken as depth is achieved in the glass.


If the photomask is darkening quickly, pull back the nozzle an inch or two. The darkening color of the photomask is a result of the film burning. Do not continue blasting until the photomask is black.
I used aluminum oxide 150 grit to achieve depth with the blasting pressure set at 50 psi (FIGURE 13). Aluminum oxide or silicon carbide could be used in 120–150 grit. If I had used 120 grit abrasive, I’d have set my blasting pressure at 35–40 psi.
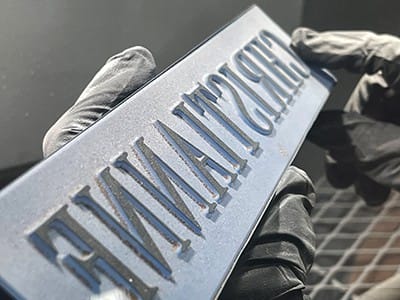
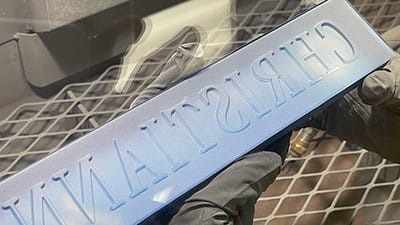
Once the depth was achieved on the name (FIGURE 14), I used a picker to peel up the letters and expose the polished glass (FIGURE 15). This surface, protected by the mask, was still shiny, polished optical crystal—but not for long.
I reduced my blasting pressure to 20 psi (FIGURE 16) and extended my nozzle distance to 8 in. from the glass. The reduced blasting pressure and increased nozzle distance allowed me to frost the letters of the name, creating a subtle change.


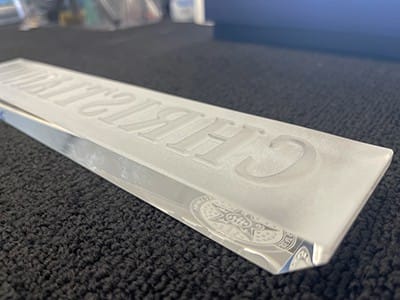
With the back of the glass completed (FIGURE 17), the next stencil to etch was the last name on the front. I sandcarved the image until I reached my desired depth (FIGURE 18 and FIGURE 19).
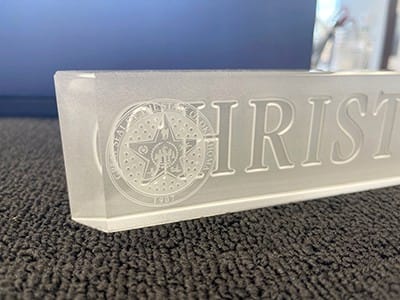
Lastly, I sandcarved the state seal (FIGURE 20) until moderate depth was achieved.
Because I only planned to color fill the last name on the front, I was able to peel away much of the photomask (FIGURE 21) at this point to reveal the carved state seal on the front (FIGURE 22) and the deeply blasted first name (FIGURE 23) on the back.
Color Fill
Photoresist is not just a sandblasting film, but the perfect product to use when adding a color fill to the etched area on a project. That’s why I left the mask in place on the last name on the front of the nameplate.

After sandcarving, use an air gun to remove any dust and debris from the etched area. In a well-ventilated area or paint booth, use spray paint or hand paint in the etched area. Shake the spray paint well and test spray prior to painting the project.
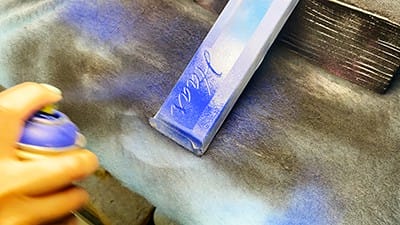
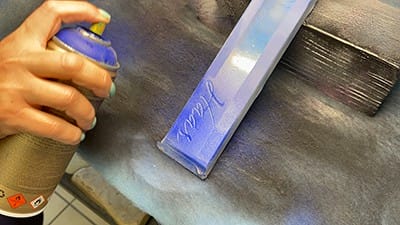
It is important to paint in light coats from different angles (FIGURE 24 and FIGURE 25). I used Montana GOLD series spray paint for this project because I prefer the glossy finish.
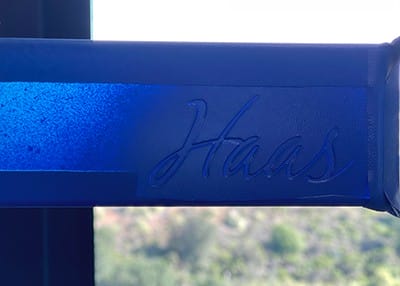
I inspected the paint (FIGURE 26) and confirmed it was dry before removing the photomask. The photomask peels away easily, leaving behind a beautiful etched color fill design (FIGURE 27).
Add Value
Offer additional value on glass by using photoresist stencils to allow for stage-carving, paint fill, and more. Provide options for your customers. Show samples of the possibilities that you can offer with sandcarving and photoresist film. Give your customers potential to upgrade to a product with depth or color fill.
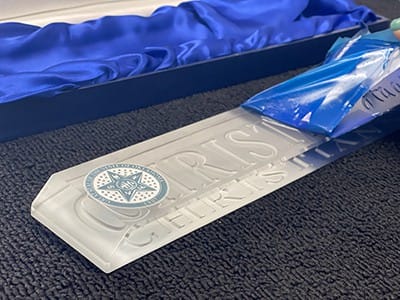
Don’t underestimate the sandcarving process. There is so much that can be done with a photoresist stencil. This nameplate (FIGURE 28) was a simple yet creative and impressive piece made achievable with photoresist film.
Liz Haas is a sales representative and education director at Rayzist Photomask in Vista, CA. For nearly 20 years, Haas has used her extensive knowledge of sandcarving and photoresist film to teach, train, and help users. She has taught Award and Personalization Association members through articles in Insights magazine and by presenting sandcarving sessions at the International Awards & Personalization Expo. Rayzist Photomask has been in business, supplying sandcarving equipment and supplies, for more than 30 years and has been a member of the Awards and Personalization Association for more than 20 years. Visit rayzist.com to learn more.
Share