First of all, I want to thank all those customers, both great and small, for your continued patronage to our company. Rayzist® would not exist without each and everyone of you. Again, thank you.
I want to apologize for the lack of the personal touch, for which our company is known. You see, when we were small, we seemed to be able to take care of everything and help people in a more detailed manner. With our rapid growth, we seemed to have lost our personal touch. I have had customers invite me to weddings, stay in their homes when in their area, and spend quality time with them. It seems like those days have some how slipped away, and there is definitely something wrong with that. Again, I apologize if you have felt any of our growing pains. A change has been made and we are back to a small company attitude and are serving you in the best possible way. We are committed to each and everyone of you. Our products and services are, and will continue to be, superior to any other company in the world.
A few days ago, I had an experience with one of my customers that made me realize that we need to change from the top down. If I, being the leader, get upset with my customers, how are my customer service people doing? So changes have been made. Change is not always easy or welcomed, but it is necessary to better ourselves not only for our future, but also for yours.
Sometimes, it takes a good shot in the arm to wake you up. We have been serving our customers for over 12 years and I want to be doing this for 12 more. If we forget about whom we serve or forget to be thankful, we are missing the mark. Our goal is to please our clients, not just receive orders and ship them. The reason behind this newsletter is to bring people together and to help you do more with what you have, allowing you to be more profitable.
I hope this newsletter helps you. Feel free to call me with any suggestions or input concerning our newsletter.
Thank You,
Randy Willis
Owner
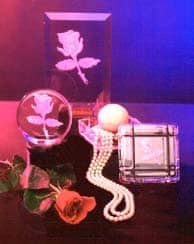
The Stage Carve Rose
Glass and crystal carving is among one of the most rewarding and satisfying art forms practiced today. The thousands who “ohh and ahh” over those delicately carved three dimensional pieces can only guess at the days or weeks required to produce each creation. Anyone who searched to uncover the secrets of glass carving discovered the consuming process of designing, tracing, hand cutting and carving. In 1983, Rayzist® Photomask introduced to the professional glass decorator a sandblast mask that vastly improved the existing hand and diecut stencils used for stage carving or dimensional glass carving. Rayzist® cut hours and days from glass decorators production schedules. Glass and crystal decorators quickly replaced the old hand cut techniques with Rayzist’s masking and found they were able to reproduce any black and white design or type into a work of art in a fraction of the time, effort and cost it took with hand cut stencils. But you don’t have to be a professional glass decorator to do stage carved pieces. All it takes is your creativity and the resources of Rayzist® Photomask to turn your artwork and glass piece into a masterpiece.
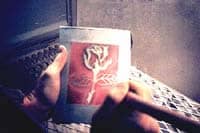
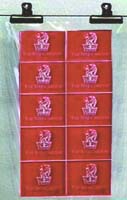
Let’s take a look at how to stage carve any piece of glass with your design. The first thing that you will need is a pull chart of your design. This pull chart serves as your guide to successful stage carving. If you take a look at Diagram #1 you will notice that there are different numbers pointing to the many sections of the rose. These numbers tell you what to pull and when you need to pull them. Each pull also is a different depth of carving. If you don’t have a pull chart for your design, Rayzist® can supply you with one for about $35.00. We also carry a large variety of stage carvable stock designs that include the pull charts.
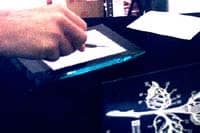
The first step in this process is to prepare the glass piece for the carve. Take your glass piece and clean it with a glass cleaner, make sure to remove any dust or films that might be on the glass piece. This will allow for the glue on the stencil to adhere to your glass piece. Next, take your stencil and remove the cover sheet, exposing the glue. Center it on your glass, and burnish it. There are two types of burnishing tools: a metal ball burnisher and a plastic flat burnisher. For this piece we used both. First the metal one, to transfer all to masking and detail to your glass piece, then the plastic burnisher for a final sweep.
After you have successfully transferred the stencil to your glass and removed the backing, place a few pieces of heavy duty duct tape over the open areas of your glass in order to prevent any over spray from the abrasive. Rub over the tape with your hand or a plastic burnisher to make sure that the tape is completely secure. If it is not secure there could be a possibility that some of the abrasive could get under the duct tape causing over spray.
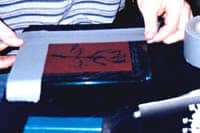
Now you are ready to start your stage carve. For the best results, use a pressure blaster, which allows you to frost, carve, or cut as you require. If you are working with a pressure pot system, we recommend using about 25 to 30 lbs. of pressure. This will give you a nice, slow, cut and will allow you maximum control of carving. Looking at your masking, you should notice that parts of the design are open, while others are just outlines. The open areas are going to be your first and deepest carve. Before you start carving, look carefully at your pull chart (Diagram #1) if your are blasting the rose). You will notice that there are some areas that are shaded. These shaded areas indicate that you need to concentrate specifically in those areas. In these areas, you want to avoid any type of sharp or peaked cuts. To avoid this, blast in small circular motions. Try not to stay in one area too long, but rather move around nice and slow to ensure full and equal coverage.
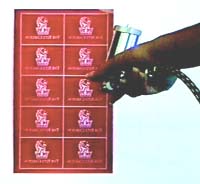
After you have completed all of stage one, it is now time to move onto to the next stages of your blast. Refer to the pull chart, to see which pieces to pull first. Using an Xacto™ knife, peel off all of the masking that is labeled with a number 2. You will notice that some of the pulls in the number 2 areas are shaded. This tells you that you need to go deeper in those areas. Concentrate your nozzle in that area, moving in small circular motions, begin to carve out that part of the design. This will give you a three dimensional effect on the rose pedals. Before you start to do the leaves, take a look at the diagram. Notice how the nozzle is pointed and is cutting deeper at B. The carving is away from the end of the last blast. This will give you a layered effect. Do the same for 2a-2g. Remember not to allow much blasting over the area that you just carved, always cutting away in circular motions.
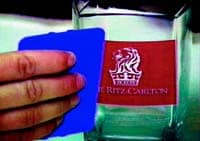
Finish your piece by blasting the number 3 areas with a light frost. Remove your glass from the cabinet and check to see that you have completely blasted each area without leaving any areas unfinished. Strip away the tape and the masking, and rinse under warm water. Dry your glass piece with a soft cotton towel. Do not use paper towels, as they will scratch your glass or crystal piece. Take special care during clean up when working with lead crystal, due to the fact that it is much softer than glass and will scratch easier.
Rayzist® Photomask carries a wide variety of stock designs for stage carving, and if we don’t have the one you are looking for, our custom Art Department can help you to create what you want. We are dedicated to helping you with all of your sandblasting needs, whether it be engraving equipment or supplying mask, our main goal is to help you look good. When time, money, and quality counts the most, everything comes up roses when Rayzist® Photomask works for you.
Steps to Success
Step 1: Artwork Development
Developing your own photomasks are not only easy, but very profitable. A quality photomask begins with quality artwork. Whether you create your artwork by hand, or design it in a computer, take time to double check these two items: Is the artwork clean? (No halftone or gray areas – just black and white) and will my film tool work? You may use a kodalith film positive or our special U.V. vellum.
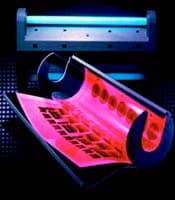
Step 2: Exposing InstaMask™
Once your artwork is on a vellum or film positive, the design can be trans-ferred to InstaMask™ Paper Back or InstaMask™ Clear photo resist. Simply contact the ink side of the vellum or film with the InstaMask™ material and expose it with your U.V. exposure unit for the designated time.
Step 3: Processing
More commonly known as washing out, this process will “develop” the image you just exposed. You can do this by either using our hand held spray assembly or one of Rayzist’s automatic spin processors. The spin processors use pressurized water to wash out the InstaMask™, taking about 1.5 minutes per cycle. Washing out with the hand sprayer will take 1.5-2 minutes, using warm water, keeping a distance of 4″-6″.
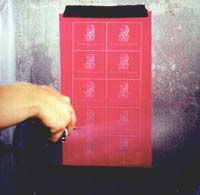
Step 4: Drying Process
After processing the InstaMask™ photo resist, you must allow it to dry. This cures the material and makes it ready for sandblasting. In a hurry? Use one of our dryers to do several sheets at a time. Otherwise, having blotted the excess water from the sheet, we recommend air drying the InstaMask™ in a dry room for about 1 hour. If time is short and you do not have a Rayzist® dryer, microwave your sheet on low power for 10 minutes. This will evaporate the moisture from the InstaMask™ material. Air drying will give you the best result.
Step 5: Adhesive Application
When the sheet of InstaMask™ is dry, the adhesive can be applied. This may be accomplished by one of two simple methods. Method 1: Use our RZ-2 water based adhesive with our easy to use InstaMask™ sprayer to spray a light coat directly on to the stencil. Method 2: Apply the adhesive onto the item that the stencil is going on. Use either a foam brush or fine bristle paint brush to apply a very light even coverage of adhesive. Which ever method is chosen, allow the glue to set 2-3 minutes before blasting.
Step 6: Transferring the Stencil
When using Rayzist’s Paper back material, just position the stencil on the item and then burnish it down with a Rayzist® metal burnisher. When using our Clear back material, simply rub down the stencil with a plastic burnisher and then peel off the clear backing sheet. By flicking a corner of the mask, the carrier is loosened, making removal easy.
Step 7: Blasting
We recommend 20-30 psi blasting pressure for most items, holding your nozzle about 4-6 inches away. Blast until you have a nice, even depth across the design areas of the stencil. You can achieve 1/8″ to 3/32″ depth using our 5 mil material. 180 grit aluminum oxide works best for sandblasting a wide variety of materials. A pressure pot system gives you superior control and the best results. Good size sandblast nozzles are 1/16″-1/8″ maximum.
Step 8: Clean Up
After you finish sandblasting, you’re ready to clean up the blasted item. You will get the best results if you put the blasted items in a sink of warm water and let them soak for several minutes. The stencil will remove easily after soaking. You can also just peel the stencil away from the item by gently rubbing your fingers over the mask. Be careful not to scratch your piece when handling it. Dry abrasive residue can cause small scratches in the surface of the blasted item.
Tips and Secrets
InstaMask™ not washing out properly
Make sure your laser printer or copy machine is printing opaque enough onto your vellum. It must be dark enough to properly shield the light when exposing. Transparency film does not give good results when used as a film tool unless the detail (as in text) is extremely thin.
Do not process the InstaMask™ under direct or indirect sunlight. This will rapidly expose the material due to the high U.V. content of sunlight. (No special darkroom or yellow lighting are needed).
Be sure and use the proper spray assembly. Low water pressure will give poor results for processing InstaMask™.
Stencil coming off of the item while blasting
Be sure to use the proper burnishing tool to transfer the stencil to the item. A hard metal burnisher gives the best results.
Coat a thin layer of adhesive onto the mask.
Apply adhesive with the InstaMask™ spray assembly.
Problems blasting the adhesive out of the open areas
If your adhesive gets too thick it may begin to act as a resist in the open areas.
Siphon system and pen size blasting users often experience more difficulty when blasting the adhesive out of the open areas. Increasing the blasting pressure will help to remove any adhesive that seems “stubborn.”
Remove excess glue by using a cotton swab and some alcohol or thinner to target problem areas.
Blasting on tight curves
When having to blast on items with severe curves, try using Instamask™ Clear. By separating the clear backing from the masking, the stencil will be easier to apply. A thin, clear layer of material ensures that all of your detail stays in position while you place the mask on the curved surface.
Vellum vs Film Transparency
Your film tool is key to the mask making process. It is absolutely critical that you have opaque enough black areas in your design. Holding the vellum up to a light source, on to a light table to see the amount of light passing through the black areas. If too much light penetrates the black areas you will be unable to produce a good mask. We recommend that you do not use a transparency film for your film tool because the toner from copiers or printers do not always transfer to the transparencys well enough. When exposing with the transperency, the ink tends to flake off. We recommend that you use our special U.V. vellum paper or a kodalith film positive. Both of these products will give you optimum results.
Customer Spotlight: Visions of Success
Visions of Success…
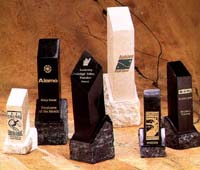
That is what Tom Meyer had when he started his company 6 years ago using just half his garage (his wife, Dana, reluctant to forfeit her car space). Since then, Visions has grown to 50 employees, more than making their mark in the corporate gift world. Meyer’s distinct use of marble slate, fossil stone, glass, and crystal has been transformed into a full line of corporate awards, plaques, and eye catching gifts. From exotic book ends, marble cased clocks, to metal masterpieces, Visions offers a full in house production of customized gifts, as well as engravable blanks for anyone to purchase and engrave on their own.
The Rayzist® Result:
Having experimented with other masks on the market, Tom says, “Rayzist® has always given me great service and a good product. Their mask is the best because application is easy. It holds up to sandblasting better and cleans up faster. If you’re doing any kind of production work at all, you’re missing it by not using Rayzist®.” Visions uses Rayzist’s InstaMask™ Clear as well as our sandblasting cabinets, wash-out units, exposure units, and spray glue assembly.
For more information on Visions and all their products, contact them at (419) 586-6433.
This mode enables people with epilepsy to use the website safely by eliminating the risk of seizures that result from flashing or blinking animations and risky color combinations.
Visually Impaired Mode
Improves website's visuals
This mode adjusts the website for the convenience of users with visual impairments such as Degrading Eyesight, Tunnel Vision, Cataract, Glaucoma, and others.
Cognitive Disability Mode
Helps to focus on specific content
This mode provides different assistive options to help users with cognitive impairments such as Dyslexia, Autism, CVA, and others, to focus on the essential elements of the website more easily.
ADHD Friendly Mode
Reduces distractions and improve focus
This mode helps users with ADHD and Neurodevelopmental disorders to read, browse, and focus on the main website elements more easily while significantly reducing distractions.
Blindness Mode
Allows using the site with your screen-reader
This mode configures the website to be compatible with screen-readers such as JAWS, NVDA, VoiceOver, and TalkBack. A screen-reader is software for blind users that is installed on a computer and smartphone, and websites must be compatible with it.
Online Dictionary
Readable Experience
Content Scaling
Default
Text Magnifier
Readable Font
Dyslexia Friendly
Highlight Titles
Highlight Links
Font Sizing
Default
Line Height
Default
Letter Spacing
Default
Left Aligned
Center Aligned
Right Aligned
Visually Pleasing Experience
Dark Contrast
Light Contrast
Monochrome
High Contrast
High Saturation
Low Saturation
Adjust Text Colors
Adjust Title Colors
Adjust Background Colors
Easy Orientation
Mute Sounds
Hide Images
Hide Emoji
Reading Guide
Stop Animations
Reading Mask
Highlight Hover
Highlight Focus
Big Dark Cursor
Big Light Cursor
Cognitive Reading
Virtual Keyboard
Navigation Keys
Voice Navigation
Accessibility Statement
www.rayzist.com
April 9, 2026
Compliance status
We firmly believe that the internet should be available and accessible to anyone, and are committed to providing a website that is accessible to the widest possible audience, regardless of circumstance and ability.
To fulfill this, we aim to adhere as strictly as possible to the World Wide Web Consortium’s (W3C) Web Content Accessibility Guidelines 2.1 (WCAG 2.1) at the AA level. These guidelines explain how to make web content accessible to people with a wide array of disabilities. Complying with those guidelines helps us ensure that the website is accessible to all people: blind people, people with motor impairments, visual impairment, cognitive disabilities, and more.
This website utilizes various technologies that are meant to make it as accessible as possible at all times. We utilize an accessibility interface that allows persons with specific disabilities to adjust the website’s UI (user interface) and design it to their personal needs.
Additionally, the website utilizes an AI-based application that runs in the background and optimizes its accessibility level constantly. This application remediates the website’s HTML, adapts Its functionality and behavior for screen-readers used by the blind users, and for keyboard functions used by individuals with motor impairments.
If you’ve found a malfunction or have ideas for improvement, we’ll be happy to hear from you. You can reach out to the website’s operators by using the following email
Screen-reader and keyboard navigation
Our website implements the ARIA attributes (Accessible Rich Internet Applications) technique, alongside various different behavioral changes, to ensure blind users visiting with screen-readers are able to read, comprehend, and enjoy the website’s functions. As soon as a user with a screen-reader enters your site, they immediately receive a prompt to enter the Screen-Reader Profile so they can browse and operate your site effectively. Here’s how our website covers some of the most important screen-reader requirements, alongside console screenshots of code examples:
Screen-reader optimization: we run a background process that learns the website’s components from top to bottom, to ensure ongoing compliance even when updating the website. In this process, we provide screen-readers with meaningful data using the ARIA set of attributes. For example, we provide accurate form labels; descriptions for actionable icons (social media icons, search icons, cart icons, etc.); validation guidance for form inputs; element roles such as buttons, menus, modal dialogues (popups), and others. Additionally, the background process scans all the website’s images and provides an accurate and meaningful image-object-recognition-based description as an ALT (alternate text) tag for images that are not described. It will also extract texts that are embedded within the image, using an OCR (optical character recognition) technology. To turn on screen-reader adjustments at any time, users need only to press the Alt+1 keyboard combination. Screen-reader users also get automatic announcements to turn the Screen-reader mode on as soon as they enter the website.
These adjustments are compatible with all popular screen readers, including JAWS and NVDA.
Keyboard navigation optimization: The background process also adjusts the website’s HTML, and adds various behaviors using JavaScript code to make the website operable by the keyboard. This includes the ability to navigate the website using the Tab and Shift+Tab keys, operate dropdowns with the arrow keys, close them with Esc, trigger buttons and links using the Enter key, navigate between radio and checkbox elements using the arrow keys, and fill them in with the Spacebar or Enter key.Additionally, keyboard users will find quick-navigation and content-skip menus, available at any time by clicking Alt+1, or as the first elements of the site while navigating with the keyboard. The background process also handles triggered popups by moving the keyboard focus towards them as soon as they appear, and not allow the focus drift outside it.
Users can also use shortcuts such as “M” (menus), “H” (headings), “F” (forms), “B” (buttons), and “G” (graphics) to jump to specific elements.
Disability profiles supported in our website
Epilepsy Safe Mode: this profile enables people with epilepsy to use the website safely by eliminating the risk of seizures that result from flashing or blinking animations and risky color combinations.
Visually Impaired Mode: this mode adjusts the website for the convenience of users with visual impairments such as Degrading Eyesight, Tunnel Vision, Cataract, Glaucoma, and others.
Cognitive Disability Mode: this mode provides different assistive options to help users with cognitive impairments such as Dyslexia, Autism, CVA, and others, to focus on the essential elements of the website more easily.
ADHD Friendly Mode: this mode helps users with ADHD and Neurodevelopmental disorders to read, browse, and focus on the main website elements more easily while significantly reducing distractions.
Blindness Mode: this mode configures the website to be compatible with screen-readers such as JAWS, NVDA, VoiceOver, and TalkBack. A screen-reader is software for blind users that is installed on a computer and smartphone, and websites must be compatible with it.
Keyboard Navigation Profile (Motor-Impaired): this profile enables motor-impaired persons to operate the website using the keyboard Tab, Shift+Tab, and the Enter keys. Users can also use shortcuts such as “M” (menus), “H” (headings), “F” (forms), “B” (buttons), and “G” (graphics) to jump to specific elements.
Additional UI, design, and readability adjustments
Font adjustments – users, can increase and decrease its size, change its family (type), adjust the spacing, alignment, line height, and more.
Color adjustments – users can select various color contrast profiles such as light, dark, inverted, and monochrome. Additionally, users can swap color schemes of titles, texts, and backgrounds, with over seven different coloring options.
Animations – person with epilepsy can stop all running animations with the click of a button. Animations controlled by the interface include videos, GIFs, and CSS flashing transitions.
Content highlighting – users can choose to emphasize important elements such as links and titles. They can also choose to highlight focused or hovered elements only.
Audio muting – users with hearing devices may experience headaches or other issues due to automatic audio playing. This option lets users mute the entire website instantly.
Cognitive disorders – we utilize a search engine that is linked to Wikipedia and Wiktionary, allowing people with cognitive disorders to decipher meanings of phrases, initials, slang, and others.
Additional functions – we provide users the option to change cursor color and size, use a printing mode, enable a virtual keyboard, and many other functions.
Browser and assistive technology compatibility
We aim to support the widest array of browsers and assistive technologies as possible, so our users can choose the best fitting tools for them, with as few limitations as possible. Therefore, we have worked very hard to be able to support all major systems that comprise over 95% of the user market share including Google Chrome, Mozilla Firefox, Apple Safari, Opera and Microsoft Edge, JAWS and NVDA (screen readers).
Notes, comments, and feedback
Despite our very best efforts to allow anybody to adjust the website to their needs. There may still be pages or sections that are not fully accessible, are in the process of becoming accessible, or are lacking an adequate technological solution to make them accessible. Still, we are continually improving our accessibility, adding, updating and improving its options and features, and developing and adopting new technologies. All this is meant to reach the optimal level of accessibility, following technological advancements. For any assistance, please reach out to